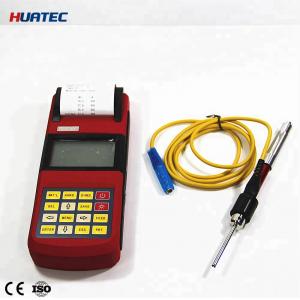
rechargeable battery integrated with printer separate D probe hardness tester portable
Detailed Product Description
3 Inch LCD,or LED Display, High precision portable hardness tester RHL160, Mutifunction Portable Hardness Tester
Main Application
- Die cavity of molds
- Bearings and other parts
- Failure analysis of pressure vessel, steam generator and other equipment
- Heavy work piece
- The installed machinery and permanently assembled parts
- Testing surface of a small hollow space
- Material identification in the warehouse of metallic materials
- Rapid testing in large range and multi-measuring areas for large-scale work piece
Features
- 3 inch LCD,or LED display
- Wide measuring range. Based on the principle of Leeb hardness testing theory. It can measure the Leeb hardness of all metallic materials.
- Large screen(128×64 dot matrix LCD), showing all functions and parameters.
- Test at any angle, even upside down.
- Direct display of hardness scales HRB, HRC, HV, HB, HS, HL.
- Seven impact devices are available for special application. Automatically identify the type of impact devices.
- Large capacity memory could store 500 groups (Relative to average times32~1 ) information including single measured value, mean value, testing date, impact direction, impact times, material and hardness scale etc.
- Upper and lower limit can be preset. It will alarm automatically when the result value exceeding the limit.
- Battery information indicates the rest capacity of the battery and the charge status.
- User calibration function.
- Software to connect with PC via USB port.
- With EL background light.
- Thermal printer integrated, convenient for in field printing.
- NI-MH rechargeable battery as the power source. Charge circuit integrated inside the instrument. Continuous working period of no less than 150 hours (EL off and no printing).
- Auto power off to save energy.
- Outline dimensions:215mm×85mm×42mm
Parameters
- Measuring range:HLD(170~960)HLD
- Measuring direction:360°
- Hardness Scale:HL,HB,HRB,HRC,HRA,HV,HS
- Display:dot matrix LCD,128×64 dots
- Data memory: 500 groups max.(relative to impact times 32~1)
- Printing paper: width is (57.5±0.5)mm, diameter is 30mm
- Battery pack: 6V NI-MH
- Battery charger: 9V/500mA
- Continuous working period:about 150 hours(With backlight off, no printing)
- Communication interface:USB1.1
- Working temperature: -10℃~+50℃;
- Storage temperature:-30℃~+60℃;
- Relative humidity: ≤90%;
- The surrounding environment should avoid of vibration, strong magnetic field, corrosive medium and heavy dust.
Testing Range
| Material | Method | Impact device |
| D/DC | D+15 | C | G | E | DL |
| Steel and cast steel | HRC | 20~68.5 | 19.3~67.9 | 20.0~69.5 | | 22.4~70.7 | 20.6~68.2 |
| HRB | 38.4~99.6 | | | 47.7~99.9 | | 37.0~99.9 |
| HRA | 59.1~85.8 | | | | 61.7~88.0 | |
| HB | 127~651 | 80~638 | 80~683 | 90~646 | 83~663 | 81~646 |
| HV | 83~976 | 80~937 | 80~996 | | 84~1042 | 80~950 |
| HS | 32.2~99.5 | 33.3~99.3 | 31.8~102.1 | | 35.8~102.6 | 30.6~96.8 |
| Cold work tool steel | HRC | 20.4~67.1 | 19.8~68.2 | 20.7~68.2 | | 22.6~70.2 | |
| HV | 80~898 | 80~935 | 100~941 | | 82~1009 | |
| Stainless steel | HRB | 46.5~101.7 | | | | | |
| HB | 85~655 | | | | | |
| HV | 85~802 | | | | | |
| Grey cast iron | HRC | | | | | | |
| HB | 93~334 | | | 92~326 | | |
| HV | | | | | | |
| Nodular cast iron | HRC | | | | | | |
| HB | 131~387 | | | 127~364 | | |
| HV | | | | | | |
| Cast aluminum alloys | HB | 19~164 | | 23~210 | 32~168 | | |
| HRB | 23.8~84.6 | | 22.7~85.0 | 23.8~85.5 | | |
| BRASS(copper-zinc alloys) | HB | 40~173 | | | | | |
| HRB | 13.5~95.3 | | | | | |
| BRONZE(copper-aluminum/tin alloys) | HB | 60~290 | | | | | |
| Wrought copper alloys | HB | 45~315 | | | | | |
Configuration
| | No. | Item | Quantity | Remarks |
| Standard Configuration | 1 | Main Unit | 1 | |
| 2 | D type impact device | 1 | With cable |
| 3 | Standard test block | 1 | |
| 4 | Cleaning brush (I) | 1 | |
| 5 | Small support ring | 1 | |
| 6 | Battery Charger | 1 | 9V 500mA |
| 7 | Paper for printing | 1 | |
| 8 | Manual | 1 | |
| 9 | Instrument case | 1 | |
| Optional Configuration | 11 | Cleaning brush (II) | 1 | For use with G type impact device |
| 12 | Other type of impact devices and support rings | | Refer to Table 3 and Table 4 in the appendix. |
| 13 | DataPro software | 1 | |
| 14 | Communication cable | 1 | |
| 15 | | | |
| 16 | | | |


